


The Nonprofit Success Pack is an amazing toolkit. Just like any tool, however, use it in the wrong way and havoc can be unleashed. Here, with some assistance from Salesforce.org experts, we give you our top 10 tips to avoid disaster.
Source: The English Farm
Rule #1: Do No Harm
Know your customer. Many of these organizations have limited support staff that may lack some advanced technical skills. “Clicks not code” should be your guiding principle.
Salesforce offers an amazing set of donated and strongly discounted solutions for nonprofits, but remember that the nonprofit may not have the resources, staffing or capacity to maintain these. Always keep this in the front of your mind when designing your solution – it needs to be sustainable once you are no longer available to the nonprofit.
Rule #2: Process
Many nonprofits do not have staff who are able to articulate requirements in the way you might be used to – you may need to be creative in how you elicit information.
Ensure that you are speaking the same language and not making assumptions. One technique I regularly use is to ask a question and then paraphrase the answer given, e.g. “So if I’ve understood correctly…”. By paraphrasing and putting it into your own words, it gives both you, and the other party, a moment to check that you have understood the message and helps identify any gaps in knowledge transfer. This also applies to business processes – nonprofit and commercial business processes are often very similar but they are rarely identical.
Rule #3: NPSP is the Best of Both Worlds so Don’t use Person Accounts!
Salesforce.org put it very strongly: implementing Person Accounts is a one-way road (once enabled, they cannot be disabled), so they are usually best avoided.
Let’s understand why:
Person Accounts are rarely the right option for nonprofits. In fact the NPSP was developed precisely because Person Accounts are so rarely the right option for nonprofits. Typically, nonprofit-specific Appexchange products don’t support Person Accounts.
The NPSP is a managed package that sits on top of the Sales or Service Clouds. This means you don’t have to choose between traditional B2B relationships, like Sales Cloud, and are able to put individuals at the heart of your nonprofit. Also the NPSP supports the extended/related family – once you dig deeper you often find that there are many additional requirements that Salesforce’s Person Accounts don’t support.
Rule #4: Appropriate Solutions
Always use the “core clouds” and declarative development options as a starting point.
Careful consideration should be taken before making changes and starting to configure the platform. Watch out as it’s easy to over complicate matters; just because someone asks for something, doesn’t mean to say it’s good for them.
You can use an app which is often easy and fast, but there could be a unsustainable cost and development isn’t completely within your control any more.
Use the 80/20 rule to determine how much configuration is worth the effort to achieve the overall result. Could the scope be changed, to free up your (and other) time/resources to do alternative requirements, with a higher return on investment?
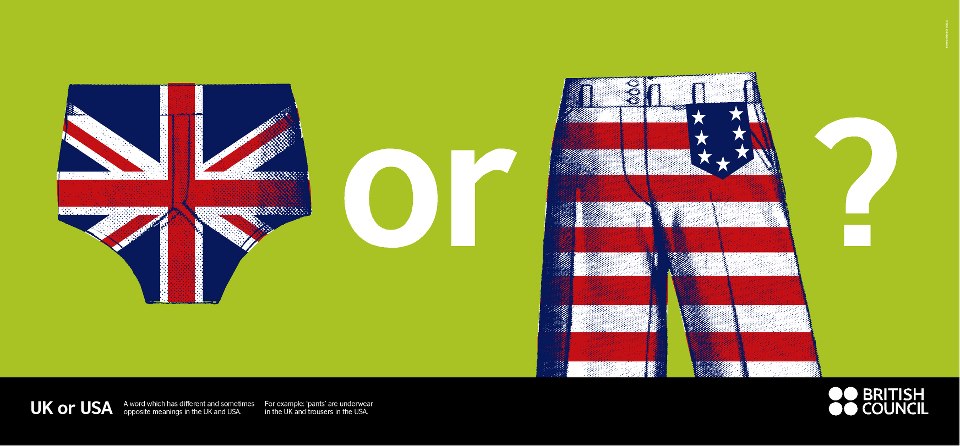
Rule #5: Culture and Language
Customs and legislation differ around the world. If you’re based in one country, helping out a nonprofit in a different country, then you need to be aware of differences. For example:
- Tax rebates are handled differently (e.g. Gift Aid in the UK has specific requirements).
- Data collection (e.g. the EU’s privacy legislation).
- Cultural differences will impact discussions around how the system is designed and even user adoption.
- What is said, verses what is meant, verses what is understood can all be different. This is still true for two counties that share the same language e.g. the US verses the UK.
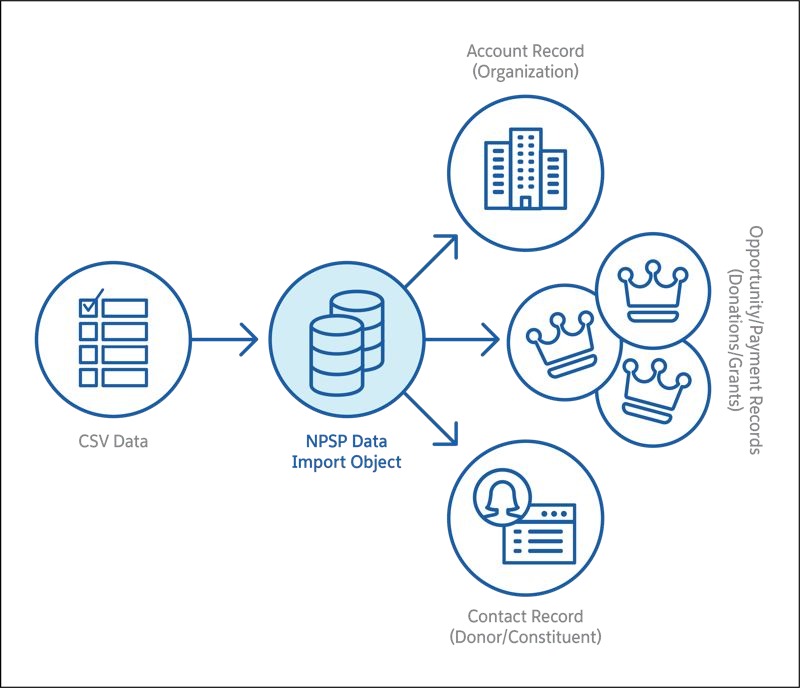
Rule #6: Consider the NPSP Data Importer rather than the Data Import Wizard
The NPSP provides a data import object to simplify the data loading process. Customers populate a CSV template with all known data, upload it to the NPSP data import object using their prefered data loading tool or the NPSP Data Importer, and the NPSP does the rest. Advanced users can leverage this object for integrations too.
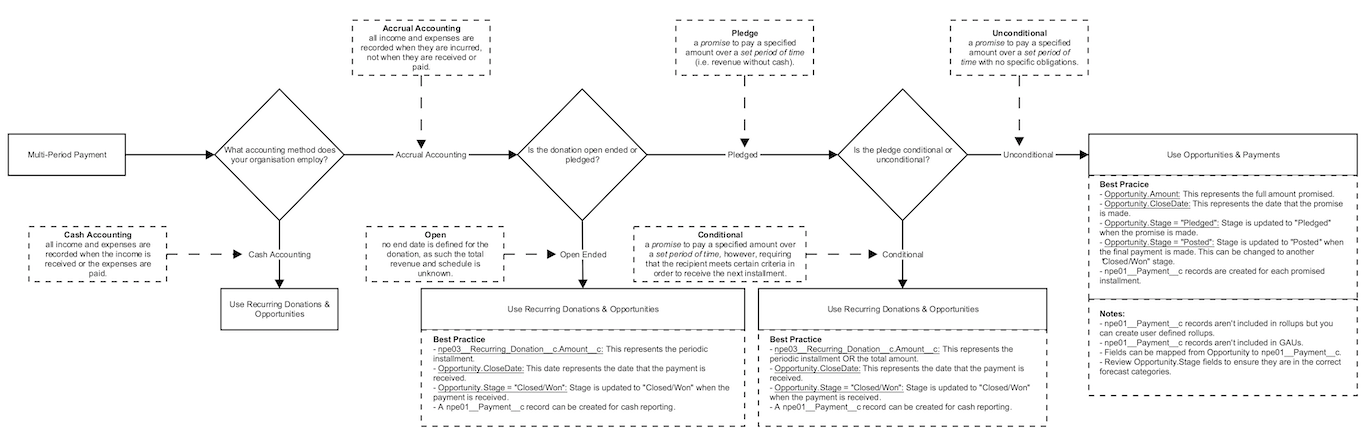
Rule #7: Recurring Donations
These are very common in EMEA but less so in the US. There are now three options:
- Legacy Recurring Donations (NPSP).
- Enhanced Recurring Donations (NPSP) – enabled by default from the start of this year for new organisations; once enabled it cannot be disabled.
- Payment Schedules (from the standard Sales Cloud).
To help choose the right option you can refer to Jesse Twum-Boafo‘s decision tree (click to enlarge).
Rule #8: Customisation Rollups
The NPSP allows you to have data rollup-able where you need it, without it needing to be part of a Parent-Child relationship and without relying on third party solutions or code-heavy custom Apex. This is useful for reports, calculations and even donor communications.
There are many out-of-the-box rollups, or you can create your own, including using filters. It’s enabled by default for any NPSP implementations from May 2019.
Rule #9: Table Driven Trigger Management!
Here we go under the bonnet of the NPSP. To handle all the logic of the NPSP, there’s a lot of Apex code. It gets complicated. If you need to add more code (or even adjust what is there) you don’t use triggers, instead use the Admin-friendly Table Driven Trigger Management (TDTM) to control the order in which the code is processed.
Rule #10: Large Data Volumes
If you have more than 500k records* in an object, you may be at risk of lookup skew and/or ownership skew. This where any relationships the record has with other records can negatively impact system performance (e.g. records can become locked or cannot be transferred between owners).
*Official Salesforce documentation says 1m records, but the plan is for your system to grow so you need to factor it in now.
Some areas to be cautious about are:
- Accounts with more than 10k contacts.
- Campaigns with more than 50k members.
- Default GAU allocation with more than 10k opportunities.
So what are the solutions?
- Generally Salesforce recommend using Flow over Apex. A helpful decision guide has now been published to help you choose the appropriate automation solution.
- One master automation per object should be the guiding principle (i.e. parent process that calls child processes).
- Other NPSP settings: some other settings can be adjusted by logging a case with Salesforce Support; this includes custom indexes, skinny tables and identifying the best NPSP settings values to optimise job performance (examples include skew mode and how many records to include in batches).
Want to learn even more?
The Power of Us Hub has migrated to the Trailblazer community. It’s a great online community and resource centre for Salesforce-using nonprofits.
Also check out Nonprofit Dreamin on 28th and 29th January 2021. This event is organised by the Salesforce nonprofit community, for the nonprofit community and tickets have now been released!
Comments: