


Something new has landed! Something that is making it so much easier for Salesforce Admins to clean, transform and merge Salesforce data, all within the native Salesforce platform.
It’s a brand new product – Salesforce Data Pipelines, which leverages the power of Tableau CRM Data Platform (formerly Einstein Analytics), which means it’s built for you to enrich data at scale.
Data Pipelines was introduced by one of the Product Managers, Antonio Scaramuzzino. An overview of the functionalities include:
- Connectors to leverage Salesforce data and external data
- Data Prep to transform, merge or aggregate data
- Out of the box smart transformations that leverage ML to gain additional insight
- Update Salesforce records with the Output node
Instead of re-introducing the product, let’s instead have a look at some top-of-mind use cases that I know a lot of Admins are struggling to do quickly and effortlessly.
Before you get started
Before digging into the use cases, it’s worth noting that you do need to first assign the permission set license “Data Pipelines Add On User Settings” as well as the permission set “Data Pipelines Add On User” to grant access to the tool. Secondly you need to enable Salesforce Data Pipelines in setup under:
Feature Settings → Analytics → Data Pipelines → Getting Started
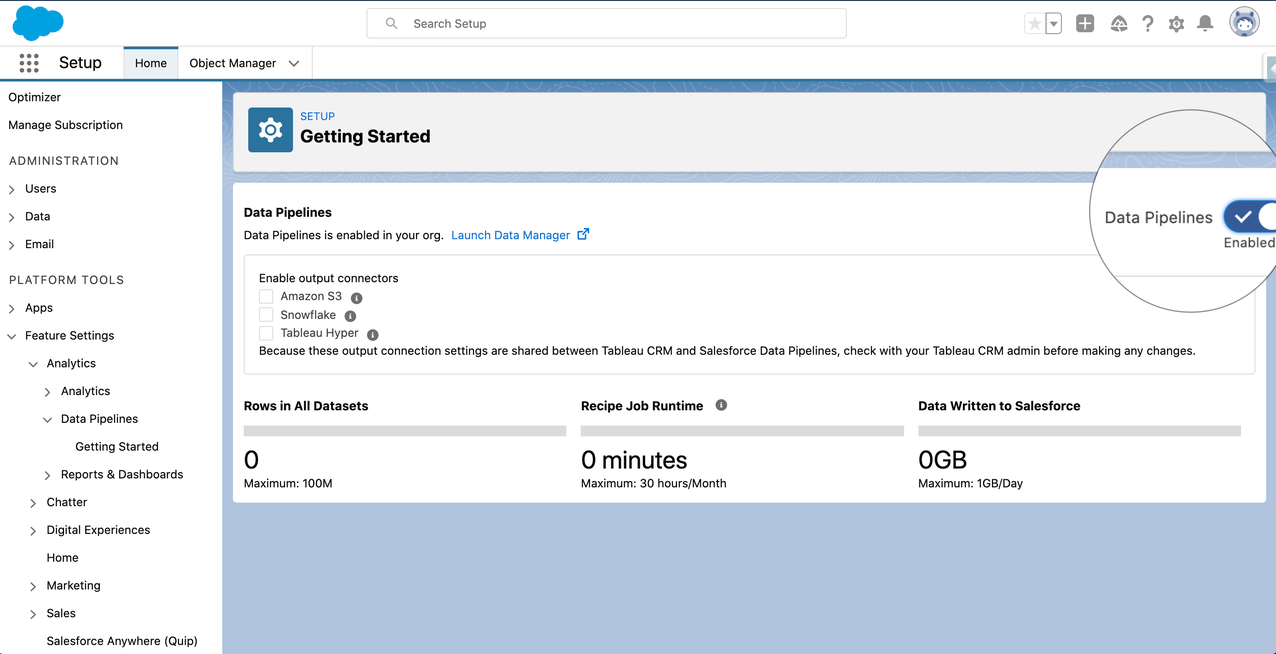
It is possible to push data to Salesforce, Snowflake, Amazon S3 and Tableau Online with the output connectors, however you do need to enable them in the settings before you can do so.
For all the details on how to get started with Salesforce Data Pipelines, you should check out Salesforce Help.
Components of Salesforce Data Pipelines
Salesforce Data Pipelines is a new product based on the technology from Tableau CRM to be exact the connectors and recipe. Hence it’s helpful to understand how the data processing of Tableau CRM works. In short, to use Salesforce Data Pipelines you need to follow these four steps:
- Setup the connector(s) incl. objects to be synced, which will fetch the data needed and make it available for you to transform
- Setup the Salesforce output connector to write back to core
- Create recipe(s) to transform and write data back to Salesforce using the output connector.
- Setup a schedule for the data sync and recipe(s) run to automate the data processing
Besides using these obvious Tableau CRM tools, there is an additional benefit of this technology. Using the Tableau CRM platform, you will be leveraging the large scale query engine, which means you do not have to worry about time out due to large data volumes (some customers are processing billions of rows of data).
Use Cases for Salesforce Data Pipelines
How better to illustrate the power of Salesforce Data Pipelines, than with use cases? I know there are tons to pick from – and I would love to hear your use case – but I’m going to pick a few that I think will resonate with many.
Example 1: Keeping contacts nice and clean
It’s easy to create new contacts in Salesforce, and while we, as admins, can add validation rules, mandatory fields and more in Salesforce, we don’t want to be too restrictive as that just stops people from entering them into the system. However we, of course, do want these contact details. In addition, perhaps you even have options for contacts to enter their own details.
Regardless of this, I am sure you already know what happens… some names are in upper case, some in lower case, phone numbers use space between numbers or perhaps others use dashes and what about country code? Oh, and my favorite for those who haven’t enabled country and state picklists, different ways of spelling mailing countries (United States vs USA), sure data has been received. You ultimately want to clean up your contacts to make them ready to be used by other tools like Pardot for mail merge or phone integration.
With Salesforce Data Pipelines I created a simple flow of data where I have:
- Added an input node for the Contact object
- Added a transformation node with three transformations
- Proper Case formula for First Name
- Proper Case formula for Last Name
- Bucket Mailing Country to streamline values
- Added an input node for phone codes (a csv file I’ve imported in the Data Manager)
- Added a join node using a lookup between my transformation node and input node for phone codes, this allows me to bring in the country code
- Added a transformation node to strip the phone number of strings and special characters plus add the phone code as well as drop unnecessary fields
- Added an output node to write back into the Salesforce Contact object.

And that’s it! With a few steps we have cleaned contact data and it’s ready to be used for reporting, marketing campaigns, phone systems etc.
Example 2: Identify critical support cases
If you are in an organization that uses Cases and has a lot of them, it may be very hard to sort through and prioritize them. So for this example, I’m going to show how you can use one of the smart transformations to enrich your Case data.
Smart transformations are “out of the box” machine learning transformations that you can apply to your data, which is a brilliant option for admins as you do not have to develop algorithms or train your data to use them. You can read more about smart transformations here.
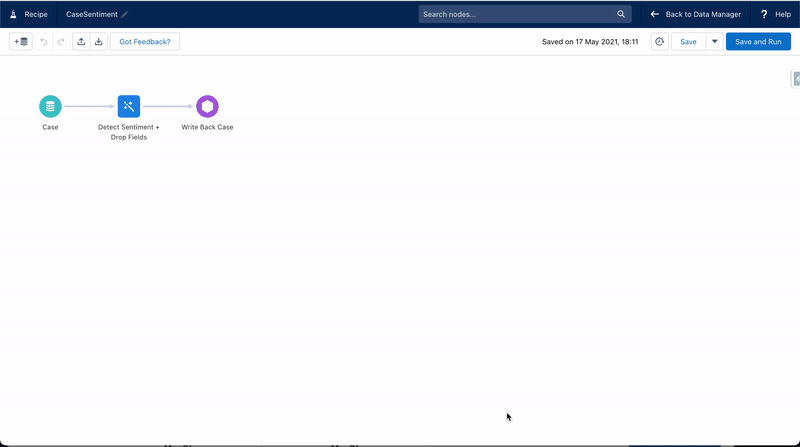
On my Case object I’ve created a new picklist field called ‘Case Sentiment’, with three values ‘Positive’, ‘Neutral’ and ‘Negative’. I will use the detect sentiment transformation to find the sentiment of the case description and then populate the new ‘Case Sentiment’ field. We can then use this field to help prioritize cases.
In Salesforce Data Pipelines, I created a new recipe with the following steps:
- Add an input node for the Case object
- Add a transformation node with two transformations
- Detect sentiment based on the description field
- Drop unnecessary fields as we don’t want to update something that might have changed since last data sync, such as case status.
- Add an output node to write back to the Case object.
With the cases updated to have sentiment analysis, you are free to create standard escalation rules for cases having a negative sentiment. Or perhaps you want to kickstart a flow with different paths for each sentiment to send out an appropriate message for surveys. Or maybe you want to use this information to add them to a Pardot engagement program. The opportunities are many.
Example 3: Enrich your account information
Now let’s look at how you can roll-up information to the Account level. Yes, of course you have to roll-up summary fields in Salesforce, but there are limitations. And perhaps what you want to roll up is not directly to the Account or perhaps this data resides in Snowflake, but you want to enhance the account overview with some aggregated numbers.
Let’s have a look at a relatively simple example where we want to see the value of won opportunities this quarter and previously, as well as what is closing this quarter and beyond. First, of course, I’ve created four new currency fields on my Account object, which I will be using to write to. Second, I’ve created a new recipe where I have:
- Added an input node for the Opportunity object
- Added a transformation node to bucket close date by relative dates (this quarter and other dates)
- Created two branches; one for won opportunities and one for open opportunities, which is done by leveraging a filter node for each branch
- Both branches get aggregated to account level showing the sum of opportunity amount by the relative date buckets using the aggregate node
- Added an input node for the Account object
- Joined both aggregated opportunity branches to the Account data with two join nodes both of the type look up.
- Added an output node to write back to the Account object.

Now your Salesforce users have a quick overview of an account’s related opportunities split just the way they have asked for. As I mentioned, you can also use external data and just leverage one of the many out of the box connectors. A great example using Snowflake was shown in this webinar. Or perhaps you want to calculate the win rate for an account. Again the opportunities are many.
What’s next?
These were just three examples, but as mentioned, the opportunities for you to transform and enhance your Salesforce data are plenty. And a unique opportunity is to leverage the smart (ML) transformations such as clustering, where you for instance can identify similar customers. This could be great insight for sales and marketing campaigns. Jim Pan, product manager at Salesforce, recently delivered a webinar on the topic.
For more information on Salesforce Data Pipelines check out the Salesforce Help pages or view the webinar where Salesforce Data Pipelines were introduced.
Hope this inspired you to see how you can make powerful data transformations at scale to provide insight and meaningful data to your users.