


The Approval Process is probably one of my all-time favorite features of Salesforce – the possibilities of what you can do with it are almost endless. Any time a person needs to grant approval for something at your business, that’s a case for a Salesforce approval process. I’ve seen them used on opportunities, quotes, campaigns, leads, and countless custom objects like new product requests, Salesforce change requests, referral requests, and more.
Approval processes can be incredibly complex processes, but the builder tool, and the way it’s displayed, make it very easy to understand, even for a beginner administrator.
In this guide, I’ll walk through a very simple example, because approval processes can be extremely varied. I will point out the places where you may need to add some sophistication, based on your business needs.
One last thing – to follow along, I am assuming you know how to create custom fields, create validation rules, modify page layout, workflow field updates, time-based actions, workflow email alerts, and create email templates.
What Is an Approval Process?
As the name suggests, an approval process in Salesforce is a way for sign-off to be granted by one (or multiple) approvers for a certain Salesforce record. Either a Standard Object (such as an Opportunity) or a Custom Object scenario (which will also be our example for this post) can have one or more associated approval processes, each with their own entry criteria – their order can also be controlled.
This automation tool comes with a few specific components and options you will need to be aware of, and use accordingly, such as Approval Steps (which we will explore below), as well as record locking and the possibility to allow approval requests to be recalled by the submitter – to name just a few.
Starting an approval process can be as easy as clicking the “Submit for Approval” button, or even automatically triggered using Salesforce Flow. Let’s get started with an approval process!
Introducing the Use Case
The Free Trial Approval Process at Stacy’s Web Services, Inc.
Stacy’s Web Services has a custom object called “Free Trial”, which contains information about a Free Trial given to a prospect. There’s the Start Date, End Date, Sales Rep, a Lookup to the Opportunity, and a Status picklist, with values Pending (default), In Progress, Completed, and Canceled. The Sales VP would like all new Free Trial requests to be routed to himself for approval, and then the Sales SVP if the Opportunity Amount is more than $50,000. These Free Trials do incur a cost to the business, so we do not want to give them out on a low value deal unless there is a compelling business reason.
Discovery Questions
With the information above, I know that I will need an approval process in Salesforce – but don’t start building just yet! The most important part of the approval process isn’t in Salesforce at all, it’s offline, with the person who is making this request. Schedule an information gathering session, and determine the details you’ll need to get started.
- Who should be allowed to submit Free Trial requests? Just Sales Reps? Anybody?
- Are there any scenarios where you might want another person in the approval process? Like EMEA Opportunities, should we route their Free Trial requests to their manager?
- When can these Free Trial requests be created? Should we allow them on an opportunity is already closed won? Should we allow them on an opportunity that is only in Stage 1 the Close Date is one year from now?
- Free Trial requests on deals less than $50,000 should route to the SVP of Sales. Do we want to require the requester to provide more information immediately up front in this scenario?
- What should happen when a Free Trial is Submitted? Approved? Rejected? Recalled?
- Is there anything else you need or want for this?
In my example, here’s how my Sales VP has answered these questions:
Q. Who should be allowed to submit Free Trial requests? Just Sales Reps? Anybody?
A. Just the sales team should be allowed to create and submit these.
Q. Are there any scenarios where you might want another person in the approval process? Like EMEA Opportunities, should we route their Free Trial requests to their manager?
A. Yes, actually! Any renewal opportunity should route their approval through their manager.
Q. When can these Free Trial requests be created? Should we allow them on an opportunity is already closed won? Should we allow them on an opportunity that is only in Stage 1 the Close Date is one year from now?
A. No definitely not. We only want to allow Free Trial requests on Opportunities in Stages 2-5, and when the close date is within this quarter.
Q. What happens if something doesn’t meet this criteria?
A. They should not be allowed to create a Free Trial request.
Q. Free Trial requests on deals less than $50,000 should route to the SVP of Sales. Do we want to require the requester to provide more information immediately up front in this scenario?
A. Yes, if the deal is less than $50,000 let’s ask the Sales Rep to fill out a Compelling Reason for giving a Free Trial on a small deal.
Q. What should happen when a Free Trial is Submitted? Approved? Rejected? Recalled?
- Send email to the requester, “Your request has been submitted”
- Change Approval Status to “Submitted”
- Fill out the “Date Submitted”
Q. What should happen when a Free Trial is Approved?
- Send an email notifying the requester
- Change the status to “Approved”
- Fill out the “Date Approved”
- Change the Free Trial Status to “In Progress”
- Fill out the Free Trial Start Date with Today’s date
- Fill out the Free Trial Start Date with 45 days from now
Q. When the request is Rejected?
- Send an email notifying the requester
- Change the status to “Rejected”
Q. What should happen when a Free Trial is Recalled?
A. Change the status to “Recalled”
Q. Is there anything else you need or want for this?
A. I’m concerned that Sales Reps might try to change the “Free Trial Status” to “In Progress” before the Free Trial is approved. Please prevent that from happening.
Great! Now that we know how we want the Salesforce approval process to work, time to start building in the sandbox! The approval process in Salesforce is going to reference the Free Trial object.
Step 1: Modifying the Custom Object
There’s several modifications I need to make to that object before I can start building the approval process itself.
Here’s the Free Trial object before I start adding to it:

I need to:
- Create a Validation Rule blocking the creation of Free Trials that do not meet the criteria.
- Create some new custom fields.
- Verify that users have the correct CRED permissions.
- Update the page layout.
- And also, create a Validation Rule preventing the Free Trial Status from being changed to “In Progress” unless the Approval Status is “Approved”.
The new custom fields you need to create:
| Field Name | Field Type | Values | Security |
|---|---|---|---|
| Approval Status | Picklist | Pending (default), Submitted, Approved, Rejected, Recalled | Read only & on the page layout |
| Date submitted | Date | Read only & on the page layout | |
| Date Approved | Date | Read only & on the page layout | |
| Final Approver | Text Area | Read only & on the page layout | |
| Opportunity Amount | Formula | Populated from Opportunity | Visible to all users |
| Opportunity Stage | Formula | Populated from Opportunity | Visible to all users |
| Opportunity Type | Formula | Populated from Opportunity | Visible to all users |
| Compelling Reason | Text Area | Editable |
Here’s the Free Trial object after adding the new custom fields. I like to group my fields into relevant sections, but that’s up to you!

We also need to create some email templates:
- You have submitted a Free Trial
- Your Free Trial has been Approved
- Your Free Trial has been Rejected
- A Free Trial Needs your approval
Now that all of the fields have been created, validation rules are done, page layout rearranged, and our email templates are created, we can start building the approval process!
Step 2: Create the Approval Process, Choosing the “Standard Setup Wizard”
- Name your approval process
- Specify entry criteria – What is the minimum criteria a record must have to enter the approval process?
You can enforce opportunity stage requirements here, you can enforce a variety of requirements here but remember, the approval process does not have an error message. So, if a user submits a record that does not meet criteria, they will not know exactly which criteria they’re missing. That’s why we built those validation rules earlier, instead, because we can use them to display a specific error message to the user. - Approver & Editability – who should be the default approver (if any) and who should be able to edit this record, while its in the process?
- Approval Assignment Notification Template – use the A Free Trial Needs your approval email template you created earlier
- Approval Page Layout – when the manager goes to approve this record, which fields should they see on the page?
- Initial Submitters – who should be allowed to submit the record for approval?
When you get to the final page, just click “I’ll do this later”.

Now take a break, stretch your legs, and get some fresh air!
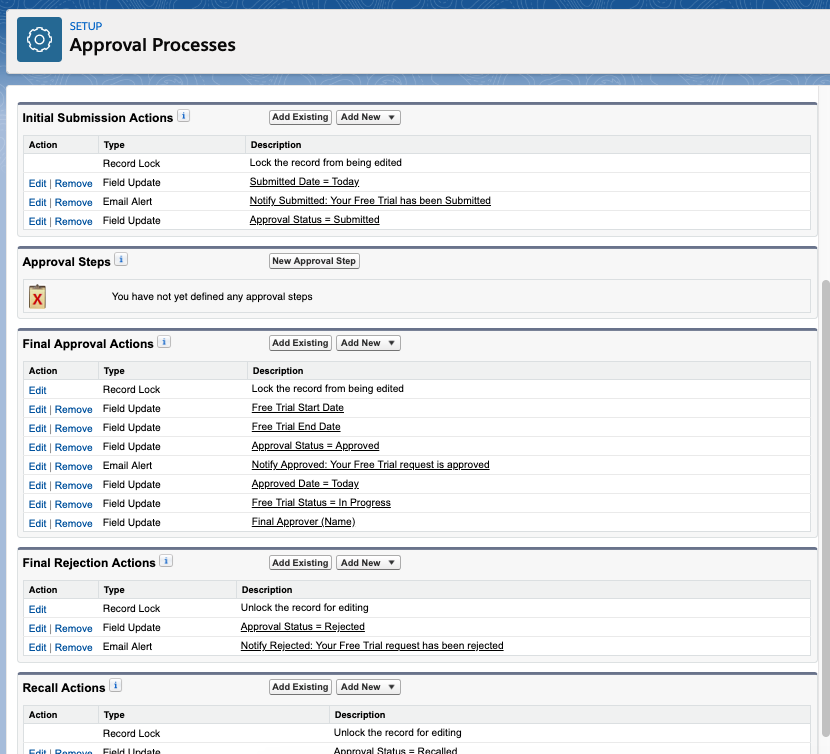
Step 3: Set Actions
Once you feel refreshed, come back to the approval process you just created.

If at any point, you need to make modifications, just click “Edit” and select the area that needs to be updated.
Now we can move on to our actions and approval steps. Remember earlier we asked the Sales VP, “What should happen when…” This is where we get to use that information.

We’re going to start with the Actions and come back to the approval steps later. Here are some definitions:
- Initial Submission Actions: “What should happen when a Free Trial is submitted?”
- Final Approval Actions: “What should happen when a Free Trial is approved?”
- Final Rejection Actions: “What should happen when a Free Trial is rejected?”
- Recall Actions: “What should happen when a Free Trial is recalled?”
Under each action, we need to add in the Field Updates and Email notifications that were requested by the Sales VP. Click “Add New” and then click “Email Alert” or “Field Update” accordingly. Just go down the list and make sure that each action is executed at the proper time.
Some tips:
- When using email alerts, consider having them come “From” an Organization-Wide email address, like freetrials@mycompany.com that way anyone who tries to reply to one of these emails gets sent to the proper team.
- If you have an additional need for time-based actions (in this example, I might like to automatically change the Free Trial Status to Completed after 45 days) make sure to check the box on your Field Update.

Step 4: Map Approval Steps
You’ll need to take another break from Salesforce. If you’re new to building approval processes, and you have a lot of steps, it might help to actually map the next section out on a whiteboard or piece of paper.
Figure out how many people need to approve, what order they need to approve in, and what the criteria is for each person. In this example, we have only three people.

Ordering your approval steps correctly is a fine art; I like to think of the order as a funnel. The most broad volume of approvals should be at the top, and the lowest volume should be the last approver. The most broad, in this case, is the VP of Sales, who will be approving all Free Trials. Next, would be the Renewal Manager, who will be approving around 25% of Free Trials, and then finally the SVP of Sales, who will be approving <5% of Free Trials. With that in mind, our funnel looks something like this:

When we add the steps to Salesforce, it looks like this:

- Name & Description: It’s very important to give each step a clear name and description. Do not name your steps for the people within them – people change all the time, and you don’t want to have to rename a bunch of steps when management changes!
- Criteria: Just like the entry criteria, just like workflow rule criteria, and just like Validation Rules (formula). Make sure you select the appropriate radio button (all records or specified records), and then create your criteria for that step.


On every step (except the last one) you will see an additional option: “else” This is explaining what happens if a record does not meet the criteria to enter this step.
- Go to the next step
- Approve record
- Reject record

For Step 1, VP of Sales, we use “All records should enter this step.” For step 2, we use criteria, and “else go to next step” because only the Renewal Opportunities should go through this step. For the final step, you will not be able to choose an “else” action. If a record does not meet any of the criteria specified in this approval process, it will be automatically rejected.
Step 5: Activate!
That’s it! Now it’s time to activate this approval process and test this out in the sandbox. I like to list out scenarios that should be tested, try them out, and then have my users do testing as well. You want to do at least one test for every possible scenario, cover any validation rules you created, and also consider your CRED for the users. Once all of your tests are successful, gather everything in a change set, and push it all to production.
If you have an extremely complex flow, or with different teams needing different paths, it might be worth considering having multiple approval processes for each team. This is common in international teams, or on the quote object, where different teams might have different pre-approved discount thresholds. When working with multiple approval processes, keep in mind they will be evaluated in the order you place them, and then accessible through the entry criteria of that process.
Summary
The Salesforce approval process is a great way of having a permanent, documented history of approvals right on the record in question in Salesforce – you’ll never ask, “Who approved this?” again. They can be intimidating to create, but as long as you start in sandbox, have a thorough plan, and go step by step, you will find they are actually much easier to implement and maintain than they appear at first glance. With a little practice, you’ll wonder how you ever lived without them!
Comments: